Emmet for HTML: A Beginner's Guide to Writing Faster Markup
Learn how to write HTML 10x faster with Emmet shortcuts. Perfect for beginners who want to speed up their coding.
Imagine typing just a few characters and watching them transform into complete HTML structures. No more typing every single angle bracket, no more forgetting closing tags, no more repetitive copy-pasting. That’s the magic of Emmet.
The Problem: Writing HTML the Slow Way
Let’s be honest — writing HTML by hand can be tedious. Look at this simple navigation menu:
The Manual Way (What You Might Do Now):
<nav>
  <ul>
    <li><a href="/">Home</a></li>
    <li><a href="/about">About</a></li>
    <li><a href="/services">Services</a></li>
    <li><a href="/contact">Contact</a></li>
  </ul>
</nav>
That’s 177 keystrokes (including tabs for indentation).
Count them:
<nav>→ 5 characters- Line break + indent
<ul>→ 4 characters- Four
<li><a href="...">...</a></li>blocks - Closing tags for everything
Now imagine doing this for an entire webpage. It adds up fast.
The Solution: Meet Emmet
Emmet is a shortcut language for HTML (and CSS). Think of it like texting abbreviations:
| Instead of typing… | You type… |
|---|---|
| ”Be right back" | "brb" |
| "Laugh out loud" | "lol" |
| "Navigation with list items” | nav>ul>li*4 |
What is Emmet in simple terms?
Emmet is a tool built into most code editors (VS Code, Sublime Text, WebStorm) that:
- You type short abbreviations
- Press
Tab(orEnter) - Emmet expands them into full HTML
It’s like autocorrect, but for code.
How Emmet Works in Your Editor
Step-by-Step Workflow
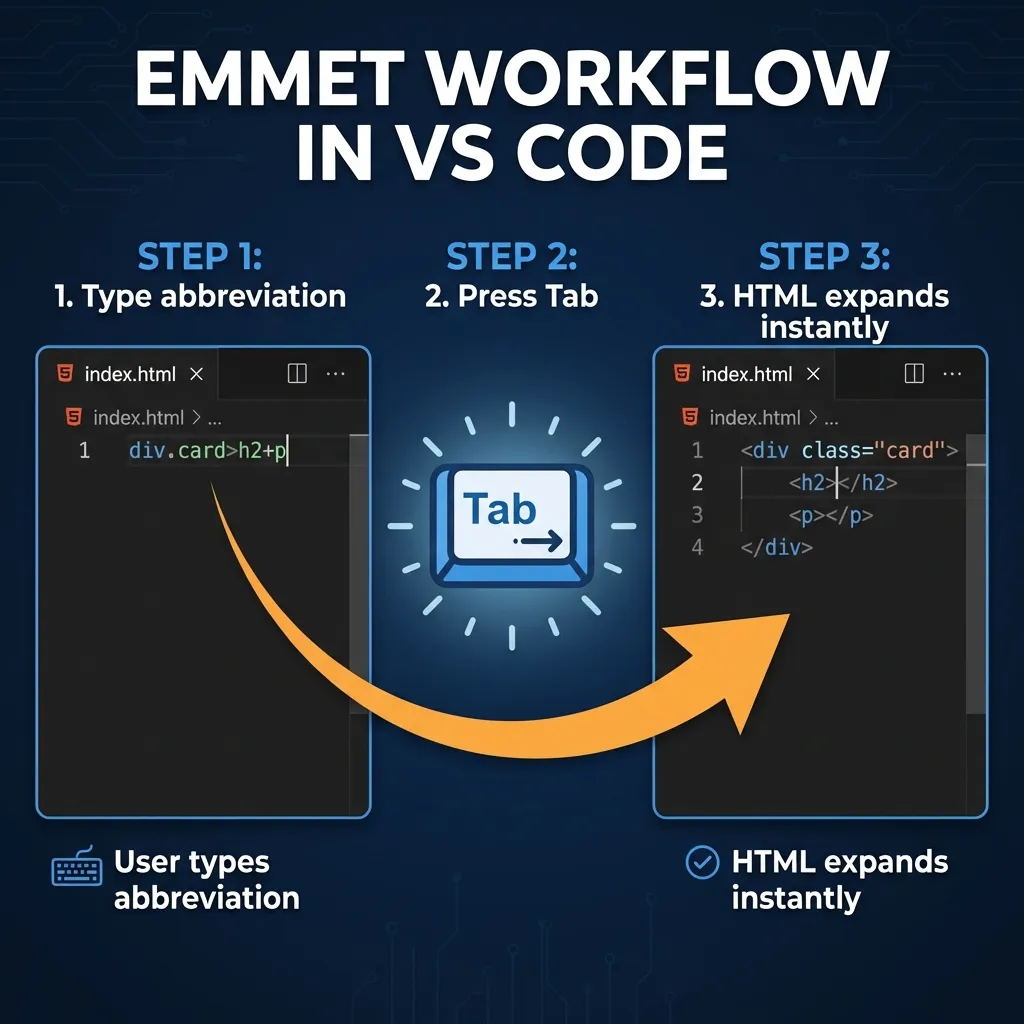
- Type the abbreviation (like
div.container) - Press Tab (or Enter in some editors)
- Watch it expand into
<div class="container"></div> - Your cursor is positioned inside the element, ready to type
Which Editors Support Emmet?
- VS Code ✓ Built-in (recommended for beginners)
- Sublime Text ✓ Built-in
- Atom ✓ Built-in
- WebStorm ✓ Built-in
- Brackets ✓ Built-in
Good news: If you’re using a modern code editor, you probably already have Emmet installed.
Basic Emmet: Creating Elements
Let’s start with the simplest possible example.
Creating a Single Element
Emmet:
divPress Tab → Expands to:
<div></div>Your cursor is placed between the tags, ready to type content.
Any HTML Element Works
| Emmet | Expands To |
|---|---|
p | <p></p> |
h1 | <h1></h1> |
section | <section></section> |
article | <article></article> |
button | <button></button> |
Try it yourself: Open your editor and type p, then press Tab. See what happens!
Adding Classes and IDs
This is where Emmet starts saving you real time.
Adding a Class
In CSS, classes use a dot (.classname). Emmet uses the same idea:
Emmet:
div.containerPress Tab → Expands to:
<div class="container"></div>What you saved: Instead of typing class="container", you just added .container
Adding Multiple Classes
Emmet:
div.container.fluid.responsivePress Tab → Expands to:
<div class="container fluid responsive"></div>Adding an ID
In CSS, IDs use a hash (#idname). Same in Emmet:
Emmet:
nav#main-navPress Tab → Expands to:
<nav id="main-nav"></nav>Combining Classes and IDs
Emmet:
section#hero.hero-section.centeredPress Tab → Expands to:
<section id="hero" class="hero-section centered"></section>Notice: Emmet automatically puts the ID first, then classes. Perfect every time.
Creating Nested Elements (The > Symbol)
The > symbol means “inside” or “child of.”
Simple Nesting
Emmet:
nav>ulPress Tab → Expands to:
<nav>
  <ul></ul>
</nav>
Deeper Nesting
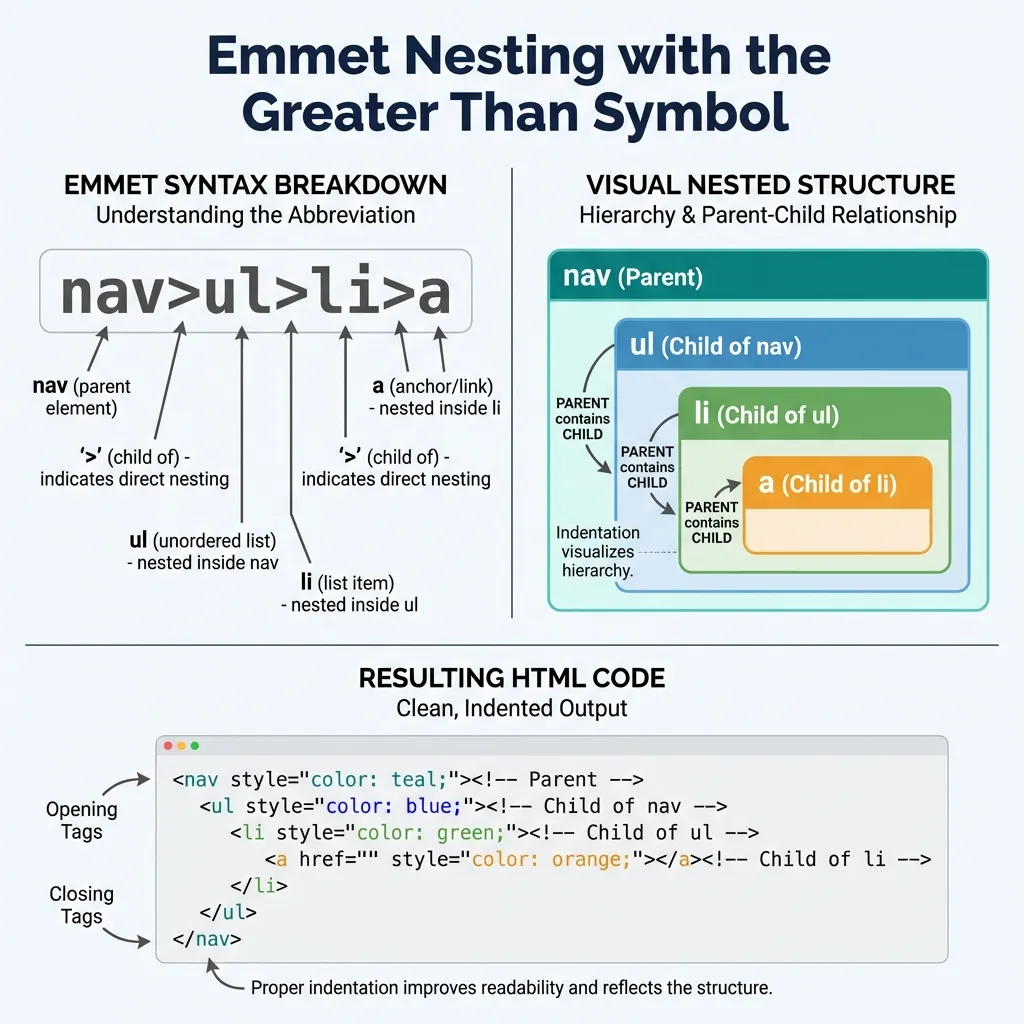
Emmet:
nav>ul>liPress Tab → Expands to:
<nav>
  <ul>
    <li></li>
  </ul>
</nav>
Real-World Example
Emmet:
article.card>img+h2+pPress Tab → Expands to:
<article class="card">
  <img src="" alt="">
  <h2></h2>
  <p></p>
</article>
Visual breakdown:
article.card      → <article class="card">
       >          →     (open and nest)
        img       →     <img>
         +        →     (sibling, same level)
          h2      →     <h2>
           +      →     (sibling)
            p     →     <p>
Try it yourself: Type header>nav and press Tab. See the nesting!
Creating Siblings (The + Symbol)
The + symbol means “at the same level” or “sibling.”
Basic Siblings
Emmet:
header+main+footerPress Tab → Expands to:
<header></header>
<main></main>
<footer></footer>
Combining Nesting and Siblings
Emmet:
header>h1+nav>ul>li+li+liPress Tab → Expands to:
<header>
  <h1></h1>
  <nav>
    <ul>
      <li></li>
      <li></li>
      <li></li>
    </ul>
  </nav>
</header>
How to read this:
header→ Create a<header>>h1→ Inside header, add an<h1>+nav→ Add a<nav>sibling to h1 (also inside header)>ul→ Inside nav, add a<ul>>li+li+li→ Inside ul, add three<li>siblings
Repeating Elements (The * Symbol)
This is where Emmet saves you the MOST time.
The Multiplication Magic
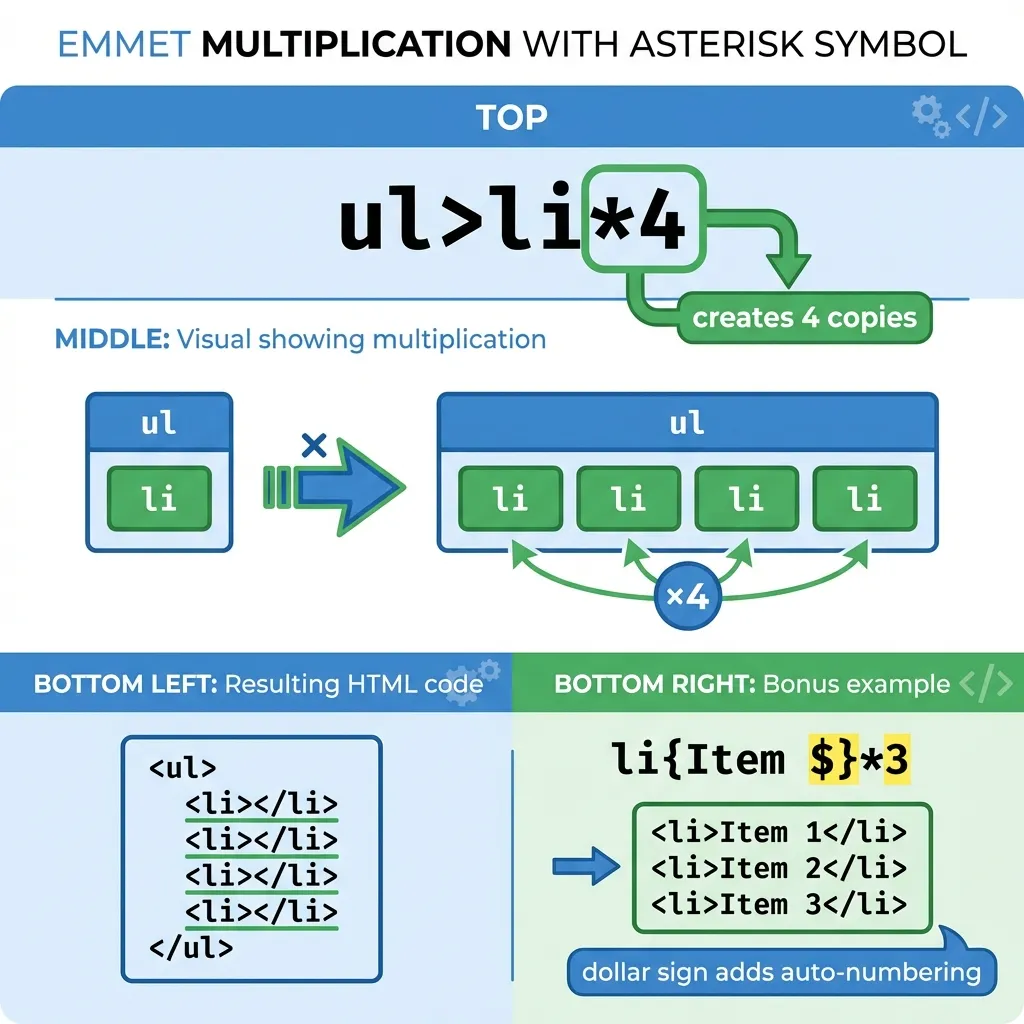
The Problem: You need 5 list items for a navigation menu.
The Slow Way:
<li></li>
<li></li>
<li></li>
<li></li>
<li></li>
The Emmet Way:
li*5Press Tab → Expands to:
<li></li>
<li></li>
<li></li>
<li></li>
<li></li>
Real Navigation Menu Example
Emmet:
nav>ul>li*5>a{Link $}Press Tab → Expands to:
<nav>
  <ul>
    <li><a href="">Link 1</a></li>
    <li><a href="">Link 2</a></li>
    <li><a href="">Link 3</a></li>
    <li><a href="">Link 4</a></li>
    <li><a href="">Link 5</a></li>
  </ul>
</nav>
What just happened?
nav>ul→ Navigation with unordered list inside>li*5→ Five list items inside the ul>a{Link $}→ Each li contains an anchor tag with text “Link 1”, “Link 2”, etc.
The $ symbol is replaced with numbers 1, 2, 3, 4, 5.
Numbered Classes
Emmet:
ul>li.item$*3Press Tab → Expands to:
<ul>
  <li class="item1"></li>
  <li class="item2"></li>
  <li class="item3"></li>
</ul>
Real-World Example: Product Grid
Emmet:
section.products>article.product*6>img+h3{Product $}+p{Description $}+button{Buy}Press Tab → Expands to:
<section class="products">
  <article class="product">
    <img src="" alt="">
    <h3>Product 1</h3>
    <p>Description 1</p>
    <button>Buy</button>
  </article>
  <!-- 5 more products... -->
</section>
Count the keystrokes:
- Manual: ~400+ characters
- Emmet: ~85 characters
- You saved: 315+ keystrokes!
Adding Attributes
Sometimes you need to add attributes like src, alt, href, or type.
The Attribute Syntax
Use square brackets [] for attributes:
Emmet:
img[src="photo.jpg" alt="My photo"]Press Tab → Expands to:
<img src="photo.jpg" alt="My photo">Common Examples
| Emmet | Expands To |
|---|---|
a[href="/about"] | <a href="/about"></a> |
input[type="text"] | <input type="text"> |
input[type="email" placeholder="Your email"] | <input type="email" placeholder="Your email"> |
link[rel="stylesheet" href="style.css"] | <link rel="stylesheet" href="style.css"> |
Combining Everything
Emmet:
form.contact>input[type="text" placeholder="Name"]+input[type="email" placeholder="Email"]+textarea[placeholder="Message"]+button[type="submit"]{Send}Press Tab → Expands to:
<form class="contact">
  <input type="text" placeholder="Name">
  <input type="email" placeholder="Email">
  <textarea placeholder="Message"></textarea>
  <button type="submit">Send</button>
</form>
The HTML5 Boilerplate Shortcut
This is the single most useful Emmet command for beginners.
The ! Shortcut
Emmet:
!Press Tab → Expands to:
<!DOCTYPE html>
<html lang="en">
<head>
  <meta charset="UTF-8">
  <meta name="viewport" content="width=device-width, initial-scale=1.0">
  <title>Document</title>
</head>
<body>

</body>
</html>
One character creates your entire HTML structure!
Starting a New Page
From now on, every HTML file you create:
- Type
! - Press Tab
- Start coding in the body
No more copy-pasting boilerplate or typing it manually.
Practice Examples
Try typing these in your editor and watch them expand:
Example 1: Simple Card
Emmet: article.card>h2{Title}+p{Content here}
Example 2: Image Gallery
Emmet: div.gallery>img*6[src="image-$.jpg"]
Example 3: Contact Section
Emmet: section#contact>h2{Get in Touch}+p{Email us}+a[href="mailto:hi@example.com"]{hi@example.com}
Example 4: Form with Labels
Emmet: form>label[for="name"]{Name}+input#name[type="text"]^label[for="email"]{Email}+input#email[type="email"]
(The ^ symbol climbs up one level — useful for complex nesting)
Quick Reference Cheat Sheet
| Symbol | Meaning | Example | Result |
|---|---|---|---|
. | Class | div.container | <div class="container"> |
# | ID | nav#main | <nav id="main"> |
> | Child | ul>li | <ul><li></li></ul> |
+ | Sibling | h1+p | <h1></h1><p></p> |
* | Multiply | li*3 | Three <li> elements |
$ | Number | item$*3 | item1, item2, item3 |
[] | Attribute | img[src="a.jpg"] | <img src="a.jpg"> |
{} | Content | p{Hello} | <p>Hello</p> |
! | Boilerplate | ! | Full HTML5 document |
Important: Emmet is Optional (But Powerful)
You don’t NEED Emmet to write HTML. It’s completely optional.
But here’s why it’s worth learning:
| Without Emmet | With Emmet |
|---|---|
| Typing every character | Type shortcuts |
| Easy to forget closing tags | Emmet generates them |
| Repetitive copy-paste | One abbreviation expands to many elements |
| Slower development | 2-10x faster |
| More typos | Consistent structure |
Think of Emmet like keyboard shortcuts in a word processor. You can write an essay without them, but why would you want to?
Daily-Use Patterns (Memorize These)
Focus on learning these patterns first — they’ll cover 80% of your needs:
!— HTML boilerplatetag.class— Element with classparent>child— Nestingsibling1+sibling2— Multiple elementsitem*n— Repeating elementstag{content}— Elements with text
Once these are muscle memory, you can explore advanced features.
Key Takeaways
- Emmet is a shortcut language for HTML
- Type abbreviation + Tab = Full HTML
.adds classes,#adds IDs>creates nesting,+creates siblings*repeats elements,$adds numbers!creates the full HTML5 boilerplate- Start simple, build up complexity gradually